Hints and Tips: Maintenance: Puncture Repair / Prevention
There aren't many things more frustrating or demoralising when you're out on a bike ride, than realising that you have a puncture. That sound, feel and moment of realisation, as your little world deflates. There's only one thing for it, pull up by the side of the road or trail and fix it. But there are so many options when it comes to puncture repair, and it's difficult to know which option is best; below I take a brief look at some of the methods and options you have when the puncture devil strikes...
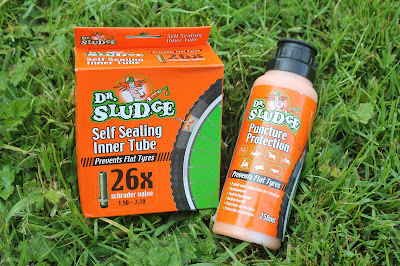 Prevention: Self Sealing Tubes
Prevention is often better than cure, that's certainly the case with punctures. There are two primary ways to prevent punctures on bikes: the tyres, and the tubes. Get yourself a good set of tyres on a road bike and you will usually be able to eliminate all but the worst punctures. For some tyre recommendations, check out my reviews page: (LINK). However, when you're mountain biking the tyre is rarely enough to prevent the thorns and flints from eventually getting through and piercing the inner tube.
What's the solution? Well one is self sealing inner tubes, such as the Dr. Sludge tubes from Weldtite. Self sealing tubes contain a fibrous solution, which when a hole is created in the tube, gets sucked into the hole by the out-flowing air, and then sets solid to fill the gap. The result is that thorns and sharp objects stick in your tyre, but they are sealed in there by the tube's solution, so don't allow air to escape.
Self sealing tubes are a great, cheap solution to puncture protection. They can be bought as a ready-filled tube, or you can buy a bottle of the sealant, which can be applied to either Presta or Schrader valves, by removing the valve core (Dr. Sludge sealant has a tool included so you can do this with Schrader valves), then squeezing the sealant in through the provided hose on the bottle.
Self sealing tubes do have some disadvantages; namely they add rotational weight to your wheels, and can cause the wheels to oscillate as the sealant moves around inside the tyre. However, these are a small price to pay, when you can eliminate a large percentage of flats with the sealant.
N.B. It is worth noting, that because the sealant needs to contact the hole to set itself in place in the first instance, it requires the tyre to be rotating. Therefore if you hear your tyre puncture, don't stop, try to keep on riding, or flip the bike upside down and spin the wheel; this will allow the sealant to move around within the tube and reach the hole.
 Quick Repair #1: Instant Patches
You've punctured, you don't have a spare tube that you can put in, but you need a quick repair. One option is self seal patches; which provide a quick and instant repair to a punctured tube.
The Red Devil patches from Weldtite come in a neat small box, which will easily fit in any saddle bag or jersey pocket. In the box are the patches and a piece of sand-paper; all you have to do is find the hole in the tube (by re-inflating it when it's out of the tyre and listening for where the hissing is coming from). Then you gently roughen the surface with the sandpaper, and apply the patch like it was a plaster.
Instant patches have many advantages; they're easier to store, there's no glue, and they're quick! The slight disadvantage is that the adhesive on them is not as strong as on traditional vulcanised patches; as a result they do tend to leak air in the longer term, especially with high pressure road tubes. The verdict? These are perfect for when you're caught out without a spare tube, or you have already used your spare. They will get you back on the road quickly and easily, and they can always be removed and a traditional stronger patch applied when you get home.
 Quick Repair #2: Aerosol Tyre Solution
Another quick fix, for when you really need to get back on the trail quickly is an aerosol tyre sealant. The concept and use is simple; the aerosol contains a latex mixture much like the Dr. Sludge self sealing tubes, but is also in a pressurized can, with enough air in it to reflate a tyre.
To operate the tyre seal you simply screw the tube onto the valve (making sure the valve is open if it's a Presta valve); then you press down on the button on the top of the can and the tube fills with air and tyre sealant.
This is the ultimate in quick fix; you don't have to remove the tube, you don't even have to remove the wheel. It can have a tyre re-inflated, and re-sealed within a minute or two. However, it does have its disadvantages; as the sealant dries it tends to clog up the valve, so you will need to replace the tube when you get home; additionally, it isn't an overly cheap solution at around £7 a can. Those issues are often forgotten though if you are stuck in the cold, and just want to get moving again quickly; that's where this solution really comes into it's own. The can contains enough air and sealant to seal even a 29 inch mountain bike tyre, and I have managed to use it on two road tyres, this helps to reduce the cost burden significantly.
N.B. This kind of sealant will not seal large gashes in tyres, or "snake bite" punctures that often occur when you hit a large pot hole. It is designed for small protruding objects such as thorns, or small shards of glass.
 Permanent Repair: Traditional Repair Kits
If you've got a puncture tube, the most reliable, effective and long-lasting repair you can make is with a traditional vulcanising solution puncture repair kit.
Admittedly this is also the most complex, and most time consuming solution, which is why many people opt to simply replace the tube rather than fix punctured tubes. However, for those on a budget, or those without the luxury of a box full of tubes (such as tourers), these kits are a must.
The Cure.C.Cure from Weldtite is one of the best known puncture repairs around; it has evolved over the years as a good value, reliable solution. In the box you get an assortment of patch sizes, a piece of sandpaper, a crayon, a piece of chalk and the vulcanising solution. What are all these for?

Prevention is often better than cure, that's certainly the case with punctures. There are two primary ways to prevent punctures on bikes: the tyres, and the tubes. Get yourself a good set of tyres on a road bike and you will usually be able to eliminate all but the worst punctures. For some tyre recommendations, check out my reviews page: (LINK). However, when you're mountain biking the tyre is rarely enough to prevent the thorns and flints from eventually getting through and piercing the inner tube.
What's the solution? Well one is self sealing inner tubes, such as the Dr. Sludge tubes from Weldtite. Self sealing tubes contain a fibrous solution, which when a hole is created in the tube, gets sucked into the hole by the out-flowing air, and then sets solid to fill the gap. The result is that thorns and sharp objects stick in your tyre, but they are sealed in there by the tube's solution, so don't allow air to escape.
Self sealing tubes are a great, cheap solution to puncture protection. They can be bought as a ready-filled tube, or you can buy a bottle of the sealant, which can be applied to either Presta or Schrader valves, by removing the valve core (Dr. Sludge sealant has a tool included so you can do this with Schrader valves), then squeezing the sealant in through the provided hose on the bottle.
Self sealing tubes do have some disadvantages; namely they add rotational weight to your wheels, and can cause the wheels to oscillate as the sealant moves around inside the tyre. However, these are a small price to pay, when you can eliminate a large percentage of flats with the sealant.
N.B. It is worth noting, that because the sealant needs to contact the hole to set itself in place in the first instance, it requires the tyre to be rotating. Therefore if you hear your tyre puncture, don't stop, try to keep on riding, or flip the bike upside down and spin the wheel; this will allow the sealant to move around within the tube and reach the hole.

You've punctured, you don't have a spare tube that you can put in, but you need a quick repair. One option is self seal patches; which provide a quick and instant repair to a punctured tube.
The Red Devil patches from Weldtite come in a neat small box, which will easily fit in any saddle bag or jersey pocket. In the box are the patches and a piece of sand-paper; all you have to do is find the hole in the tube (by re-inflating it when it's out of the tyre and listening for where the hissing is coming from). Then you gently roughen the surface with the sandpaper, and apply the patch like it was a plaster.
Instant patches have many advantages; they're easier to store, there's no glue, and they're quick! The slight disadvantage is that the adhesive on them is not as strong as on traditional vulcanised patches; as a result they do tend to leak air in the longer term, especially with high pressure road tubes. The verdict? These are perfect for when you're caught out without a spare tube, or you have already used your spare. They will get you back on the road quickly and easily, and they can always be removed and a traditional stronger patch applied when you get home.

Another quick fix, for when you really need to get back on the trail quickly is an aerosol tyre sealant. The concept and use is simple; the aerosol contains a latex mixture much like the Dr. Sludge self sealing tubes, but is also in a pressurized can, with enough air in it to reflate a tyre.
To operate the tyre seal you simply screw the tube onto the valve (making sure the valve is open if it's a Presta valve); then you press down on the button on the top of the can and the tube fills with air and tyre sealant.
This is the ultimate in quick fix; you don't have to remove the tube, you don't even have to remove the wheel. It can have a tyre re-inflated, and re-sealed within a minute or two. However, it does have its disadvantages; as the sealant dries it tends to clog up the valve, so you will need to replace the tube when you get home; additionally, it isn't an overly cheap solution at around £7 a can. Those issues are often forgotten though if you are stuck in the cold, and just want to get moving again quickly; that's where this solution really comes into it's own. The can contains enough air and sealant to seal even a 29 inch mountain bike tyre, and I have managed to use it on two road tyres, this helps to reduce the cost burden significantly.
N.B. This kind of sealant will not seal large gashes in tyres, or "snake bite" punctures that often occur when you hit a large pot hole. It is designed for small protruding objects such as thorns, or small shards of glass.

If you've got a puncture tube, the most reliable, effective and long-lasting repair you can make is with a traditional vulcanising solution puncture repair kit.
Admittedly this is also the most complex, and most time consuming solution, which is why many people opt to simply replace the tube rather than fix punctured tubes. However, for those on a budget, or those without the luxury of a box full of tubes (such as tourers), these kits are a must.
The Cure.C.Cure from Weldtite is one of the best known puncture repairs around; it has evolved over the years as a good value, reliable solution. In the box you get an assortment of patch sizes, a piece of sandpaper, a crayon, a piece of chalk and the vulcanising solution. What are all these for?
- Step 1: Find the hole in the tube - by re-inflating the tube, and listening for the hissing noise. If the puncture is really small, so there is no audible hiss, then fill a bowl with water and hold the tube down in the water; as you rotate the tube, you should find a small stream of bubbles coming out of the hole.
- Step 2: Dry the tube, and mark the puncture using the small crayon provided. Deflate the tube.
- Step 3: Abrade the surface with the sandpaper so that the glue sticks better.
- Step 4: Apply the vulcanising solution to the tube, spreading it out so that is creates a circle the size of the patch with the hole in the centre. Leave the solution to dry until it goes a cloudy colour.
- Step 5: Put the repair patch onto the glued area, pressing it down very firmly, and smoothing it out, from the centre of the patch outwards. Hold in place for at least two minutes.
- Step 6: If there is any glue around the edge of the patch grate some chalk onto it using the grater on the back of the plastic box; this will stop the tube trying to stick to the tyre when you put it back in.
- Step 7: Ideally re-inflate the tube and leave it overnight to see if the puncture has sealed properly. Then re-fit the tube to the wheel. If you don't have that luxury, just pop it back in the wheel and hope that it has!
That's it. A simple process really, but one that many people try to avoid. It is a worthwhile skill to learn, especially if you are going away from a bike shop or workshop for a long time and have a limited supply of tubes. Some parts of the process can be eliminated if they are unnecessary, such as marking the tube with the crayon, and grating the chalk (some puncture repair kits such as the Weldtite Airtite kit do not contain these objects). The trick is to practise, don't be put off if your first one doesn't work, it can take time to perfect the task. Just remember to put enough glue on to cover the full area of the patch, and press down hard on the patch when you apply it, to help squeeze out any air bubbles, and improve the chance of bonding. Good Luck!
N.B. Once the vulcanising solution has been opened for the first time, it has a limited life span, as it begins to cure within the tube. You can postpone this slightly by screwing the top on tight and wrapping the tube in a very small money bag or similar. Alternatively, if you have a box of tubes, just leave the punctured tubes until you have five or so to fix in one go, and then use the majority of the tube in one repair session.
So there you have four methods to prevent and cure a puncture; I hope that it will help you to get back on the trail or road as soon as possible, and keep you riding all season long!


Hey,excellent blog, it provide the information about Tyre repair materials thanks for posting.
ReplyDelete